・ How to Start a Blog on Blogger ・
To create a blog like the Comet, you will need a Google+ account. If you do not have a Blogger account, you can always use Wordpress, which I am not familiar with at the moment. To create a blog on Blogger, you will need to log into your Google+ account and on your profile, find the 3 by 3 tiled box on the top right-hand corner of your screen:When you click the tiled box, you should see a drop-down of apps, including Gmail, YouTube, Drive.. Click the "More" button at the bottom of the drop-down box. Look for this icon:
Or.. you can just type in blogger.com to reach the Blogger Dashboard. When you reach the Blogger Dashboard, click on the New Blog button.
 |
| Click to enlarge |
When you've clicked the button, you should see a box like this:
This is color coded, you can see the colors' meanings here:
RED: Blog Name E.G. The Animal Jam Comet
BLUE: Blog URL E.G. animaljamcometblog.blogspot.com
BLACK: Blog Template (You can choose a different one and customize it later!)
・How to Customize your Blog・
Do you want your own fonts, colors, backgrounds, and more? Well, here is where you learn how! Select the blog you want to customize by going to it's Blogger Dashboard. Click "Template" on the left-hand sidebar:
When you're on the Template tab, look for these buttons and click on the highlighted one:
When you're on the Template tab, look for these buttons and click on the highlighted one:
 |
| Sorry for the bad highlighting! The letters would only turn yellow if I highlighted it normally >.< |
IF YOU'D LIKE TO CHANGE THE TEMPLATE...
Click on the Templates tab. You can choose any template you'd like. The Comet's template is Watermark, and if you want transparent backgrounds, choose Picture Window. Don't worry, if you don't like any of the backgrounds with the default templates, you can use any photo as your background!
IF YOU'D LIKE TO CHANGE THE BACKGROUND...
Click on the Background tab. There should be an image of your current background, unless it looks like mine in the picture. In the box, there should be a small grey arrow pointing down. Click on that. You should see backgrounds from Blogger, categories, and the all-famous Upload Image. When you click "Upload Image" at the top of the category selector, you can upload your own image for the background. Click the orange "Done" button when you are done selecting your background.
IF YOU'D LIKE TO CUSTOMIZE THE WIDTHS OF YOUR BLOG...
Click on the "Adjust Widths" tab. You should see two sliders, Right Sidebar and Entire Blog. At the bottom of your screen is what your blog will look like after the changes. If you have a gadget that goes off the edge, you can adjust the sidebars so that it fits. You can also type the size you want into the text box. If you have a text gadget, make sure no text starts on one line and ends on another.
IF YOU'D LIKE TO CUSTOMIZE THE LAYOUT OF YOUR BLOG...
Click on the "Layout" tab. You can choose how many sidebars you want, if you want columns in your sidebars, or no sidebars at all. You can also decide how many rows are in the footer. I would recommend three because you can have more room to put stuff in your footer.
IF YOU'D LIKE TO CUSTOMIZE THE TEXT, FONTS, LINKS, AND MORE...
Click on the "Advanced" tab. You can look through the options to change the color of your text, fonts, link colors... All that good stuff. You don't have to put anything in the CSS box, that comes later, when you are more experienced with blogging.
When you're done customizing, click the orange "Apply to Blog" button at the top right-hand corner of your screen. Then you can press "<< Back to Blogger" and check your blog out!
・How to Add Navigation Pages to your Blog・
To add navigation pages, or links to things that you don't want to put in posts - like this page, go to the Pages sidebar in the Blogger Dashboard.
Highlighted: Select this option.Circled: How to make a page.
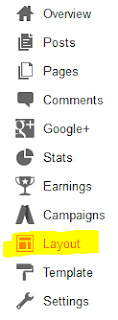
When you've made a page, go to the Layout tab.
You should see a rough layout of your blog. Click on the "Add a Gadget" where you want to place your pages (Anywhere!), and scroll down until you see this in the Add a Gadget pop-up:
Click the + button on the highlighted box, and then check off the pages you'd like to navigate to.
The checked boxes will appear on the List Order box, and you can drag a page and drop it anywhere in the ordering. A neat thing is you can change the name of your home page! Click on the Home text box on the checked box above, then type in whatever you want to name your home page if you want it something other than Home. When you are satisfied with your pages, click on the orange Save button at the bottom of the pop-up that lets you configure your pages.
If you'd like more blogging tips, you can request tutorials on this page!


Super helpful!
ReplyDeleteThanks! This is super helpful
ReplyDelete